|
Control Architect Help Documentation
|
|||||
|
|||||
|
Copyright © 2025 by Automation Software Technology, Inc. All Rights Reserved.
|
|
Control Architect Help Documentation
|
|||||
|
|||||
|
Copyright © 2025 by Automation Software Technology, Inc. All Rights Reserved.
|
|
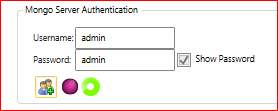
Click this button to create a new user account with administration rights for the currently connected physical MongoDB database. Clicking this button will start and stop the Mongo Server multiple times during the account creation process. The status of the Mongo Server will be displayed along with a progress indication while the new user account is being created. Wait until the progress indicator is no longer visible and the Mongo Server status LED is showing a "good" green status indication, which indicates successful completion.
 If you manage multiple physical MongoDB databases in your file system, you are required to create authentication accounts for each database. Click the Create User button when connecting to a new physical MongoDB database to create the new user account.
When using the Mongo Compass application you will also be required to create a new connection that uses the same authentication credentials you specified here.
|
|
Choose this option to enable authentication for your local Mongo Server logon. Enterprise Atlas Mongo Cloud connections use these specified credentials to update the embedded "<admin> and <password>" text with secure string values during authentication. Remote Intranet Mongo Servers will also use the specified User Name and Password to authenticate logins.
|
|
Click this button to create a deployable Package file of your local or remote MongoDB physical database. You can choose what logical Databases are packaged. Typically you will use this function to copy/move a local Host Mongo database to another physical location or to create a periodic backup.
This is the recommended way to both upgrade and/or deploy a copy of a local database to another local or remote installation.
Users can optionally copy a physical MongoDB database by:
Example MongoDump.exe and MongoRestore.exe Command Prompt usage:
D:\Program Files\MongoDB\Server\bin>mongodump /d EDV_GRIEG /c "EDV_GRIEG_20170519-<Graphics>" /archive:"E:\TestDump\EDV_GRIEG.EDV_GRIEG_20170519-%Graphics%.gz" /gzip
2018-05-20T13:05:36.830-0600 writing EDV_GRIEG.EDV_GRIEG_20170519-<Graphics> to archive 'E:\TestDump\EDV_GRIEG.EDV_GRIEG_20170519-%Graphics%.gz'
2018-05-20T13:05:39.822-0600 [######..................] EDV_GRIEG.EDV_GRIEG_20170519-<Graphics> 176/647 (27.2%)
2018-05-20T13:05:42.823-0600 [#############...........] EDV_GRIEG.EDV_GRIEG_20170519-<Graphics> 353/647 (54.6%)
2018-05-20T13:05:45.823-0600 [##################......] EDV_GRIEG.EDV_GRIEG_20170519-<Graphics> 507/647 (78.4%)
2018-05-20T13:05:48.463-0600 [########################] EDV_GRIEG.EDV_GRIEG_20170519-<Graphics> 647/647 (100.0%)
2018-05-20T13:05:48.544-0600 done dumping EDV_GRIEG.EDV_GRIEG_20170519-<Graphics> (647 documents) *
D:\Program Files\MongoDB\Server\bin>mongorestore /archive:"E:\TestDump\EDV_GRIEG.EDV_GRIEG_20170519-%Graphics%.gz" /gzip
2018-05-20T14:43:54.040-0600 preparing collections to restore from
2018-05-20T14:43:54.064-0600 reading metadata for EDV_GRIEG.EDV_GRIEG_20170519-<Graphics> from archive 'E:\TestDump\EDV_GRIEG.EDV_GRIEG_20170519-%Graphics%.gz'
2018-05-20T14:43:54.075-0600 restoring EDV_GRIEG.EDV_GRIEG_20170519-<Graphics> from archive 'E:\TestDump\EDV_GRIEG.EDV_GRIEG_20170519-%Graphics%.gz'
2018-05-20T14:43:57.006-0600 EDV_GRIEG.EDV_GRIEG_20170519-<Graphics> 358MB
2018-05-20T14:43:59.001-0600 EDV_GRIEG.EDV_GRIEG_20170519-<Graphics> 592MB
2018-05-20T14:43:59.001-0600 no indexes to restore
2018-05-20T14:43:59.002-0600 finished restoring EDV_GRIEG.EDV_GRIEG_20170519-<Graphics> (647 documents)
2018-05-20T14:43:59.002-0600 done
| ||
|
Choose this option to connect to a Remote intranet Mongo Server or Enterprise Atlas Cloud installation.
Provide the IP Address for your remote intranet Mongo Server installation or a Connection string for your Enterprise Atlas Cloud installation in the Address field.
Provide a Port address for your remote intranet Mongo Server installation only.
If authentication is required, then provide your UserName and Password credentials and choose the Use MongoServer Authentication option.
|
|
Provide the IP Address for your remote intranet Mongo Server installation or a Connection string for your Enterprise Atlas Cloud installation.
IT administrators will either provide you an IP address to connect to your Intranet server installation or provide a DNS host name that resolves to the IP address as specified in your system HOSTS file.
Connecting to an Enterprise Atlas Cloud installation will require a connection string that will be provided by your IT administrator that must be entered in this Address field.
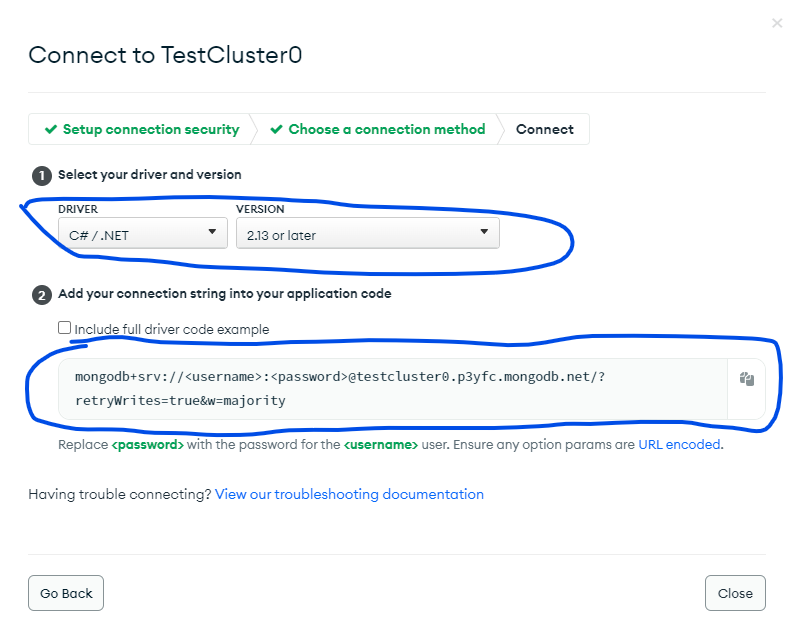
This is a typical connection string to use when connecting to a Mongo Atlas Cloud server:
mongodb+srv://<username>:<password>@testcluster0.p3yfc.mongodb.net/?retryWrites=true&w=majority
The connection string above begins with the format "mongodb+srv://UserName:Password" where UserName is automatically replaced by the Username text value and "<password>" is automatically replaced by the decrypted Password text value while connecting. Do not replace the text phrases <username> and <password> or an error will occur.
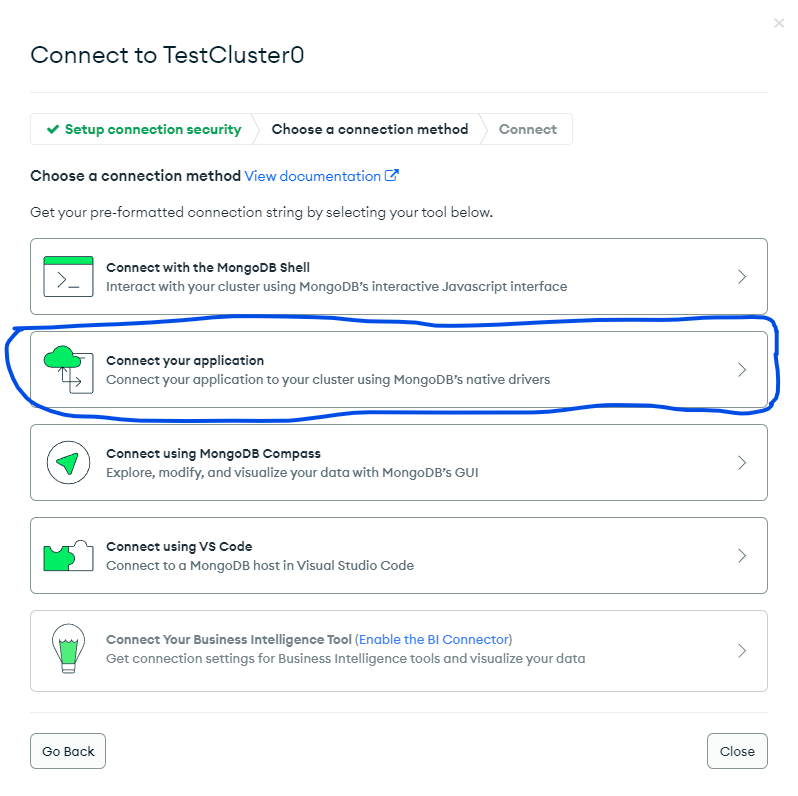
When connecting to a MongoDB Atlas cluster the required connection string is provided to you by accessing the "Connect" button on your Atlas home page and choosing to connect from an application using the driver: "C#/.NET" version: "2.13 or later".
  |
|
Click this button to view the current MongoDb Server Log content. The Log content is retrieved from the Mongo Server memory cache.
If the Mongo Server is local and the Server has stopped, then the log content is retrieved by reading the physical Mongo database log file. If an attempt to retrieve the log for a remote server fails because the remote server is not reachable, then the physical log file must be retrieved from the Mongo Server's file system.
|
 Click the View Log button to view the connected Mongo Server log that is cached in memory. If the Server is not reachable due to a bad connection or a failed MongoDB Service, then this function will attempt to retrieve the physical log file from the local Mongo Server connected database. The physical log file of a remote Mongo Server cannot be retrieved using this function.
|